Warhammer Community’s Provost Marshal Tom has been living in an Underhells of his own creation, amid endless stacks of unpainted Zone Mortalis terrain filling every dim crevasse of his ruined flat, haunted by the horribly mutated remains of his erstwhile colleagues. So to coincide with the release of the massive new Ruined Underhive Sector box, he enlisted his friend John to help him get it all into tabletop ready.
John is something of a terrain impresario, and we persuaded him to write about the uniquely abstract techniques he has used to recreate the grim mood of Hive Secundus.*

John: We were super hyped to paint a board’s-worth of terrain to represent the Underhells, mixing existing Zone Mortalis walls and columns with the new Ruined Underhive Sector.
Even by the standards of Necromunda, the irradiated depths of Hive Secundus are gross and decayed, covered in thick layers of rust, filth and ash. For this reason it made sense to focus on creating a varied and evocative atmosphere, rather than on precise details or homogenous effects. We baked a lot of randomness into the painting process, channeling our inner Jackson Pollock to provide real depth and texture with minimal effort.

We introduce variety at the first step: spraying. We undercoated everything in a uniform Chaos Black, and then made lighter passes with three other colours – Leadbelcher, Grey Seer and Wraithbone.** This immediately provides a textured base layer, and the decrepit fabric of Hive Secundus is anything but consistent. Lay all the terrain out and give it a series of zenithal*** passes with each can so that some surfaces get more silver, others more white, and others more grey.
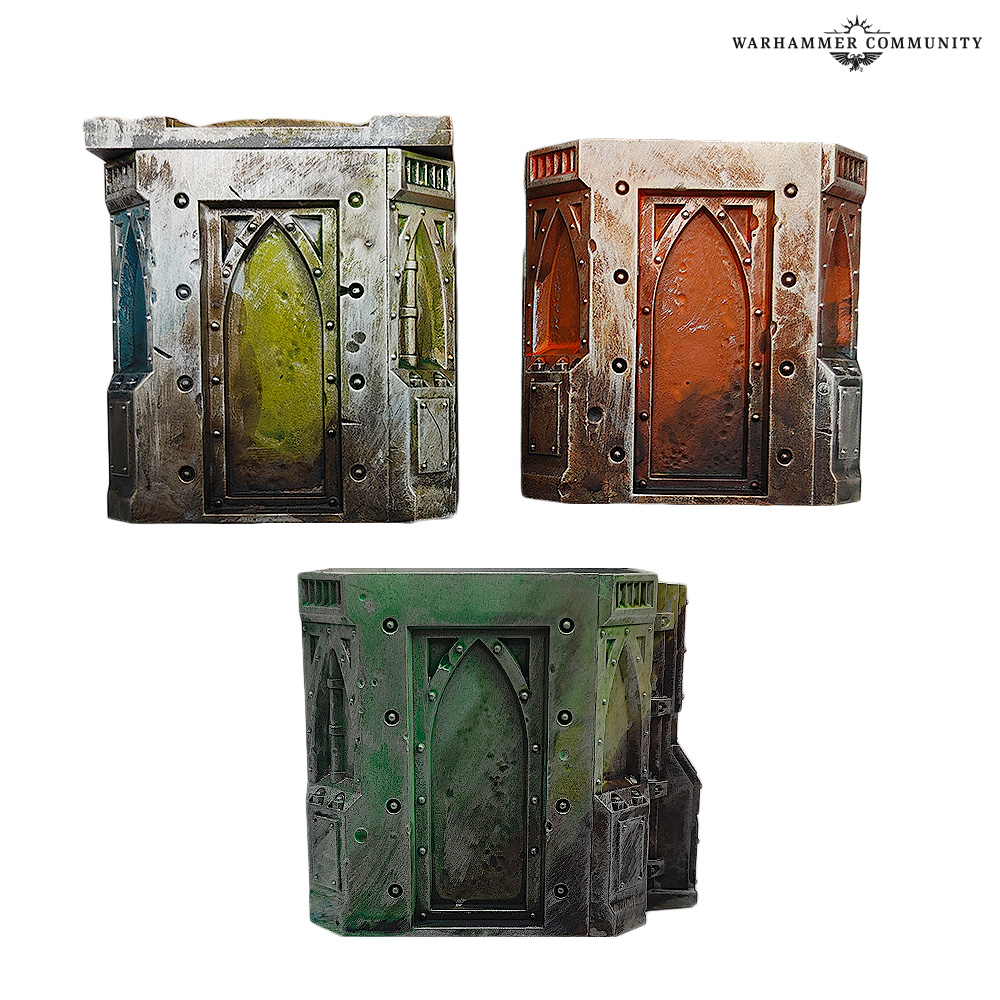

Next is the really fun part. We got all of Tom’s Contrast paints off the shelf and began to apply them at random to the different columns and walkways. We let the colours mingle together in some parts, trying to set up really vivid or even repulsive juxtapositions of colour. There is no wrong way to do this: just dab the paint on and splash some water around, then let it dry and maybe add a bit more. The more exciting and unexpected, the better.
The Contrast paints react to the variegated undercoat, creating a whole suite of different shades and colours in a matter of minutes. It will now look VERY psychedelic, but don’t worry as subsequent steps will dial this back without losing the unsettling atmosphere.


Then we applied three layers of drybrush to the metal parts – the beams, doors, panels, grills and so forth. We began in some places with a heavier overbrush of Leadbelcher or Iron Warriors and added a lighter layer of Runelord Brass, though in some places we reversed this order. This gives it all a fantastic, muted tarnish; we made sure to preserve the effect of the Contrast paint, but the metallic paints push the vibrancy into the background.
Don’t worry at all about being too neat – there’s exposed metal everywhere down here, after all. Slap on a generous coat of Nuln Oil to tie everything together, and then give all the metal parts a much lighter, top-down drybrush with Leadbelcher, reaching about halfway down towards the base.


We took a similar approach to the plascrete panels between the metal parts. We started either with a Tallarn Sand overbrush – a heavier drybrush – followed by a drybrush of Eshin Grey, or vice-versa – but pretty much any sombre grey or light tan would do. Then we splashed on a thin layer of Agrax Earthshade, and lastly gave it an Administratum Grey drybrush for highlights.
You can absolutely leave it here. However, these layers of drybrushing and shading have built up a lot of depth, and they’re the perfect backdrop for some targeted detail work to make the whole project pop.


This we duly did, focusing on the smaller, more prominent details with a lot of Stormhost Silver, giving each piece a focal point to which the eye is drawn. Even putting a quick dot on selected rivets adds extra interest.
Lastly, to really make sure all the parts felt tied together and to sell the filth and nastiness of the Underhells, we busted out two absolutely vital Contrast paints everyone should own: Ratling Grime and Garaghak’s Sewer. We messily applied them to the bases of the various walls, doors and columns, starting very thick at the very bottom, and then extending about a third of the way up.
I wanted the new Ruined Underhive terrain to stand out a bit more, so I added a few more steps. This is both because it’s awesome and because the various pieces can be used to make a standalone tile of a multi-level Sector Mechanicus board – a corner of the hab dome where the roof has fallen in and smashed things up, perhaps.


For this, we added two further layers of highlights to the metal by first applying a thinned-down layer of Reikland Fleshshade, then a light drybrush with Fulgurite Copper and Stormhost Silver. The previous layers gave this extra step a lot of depth, and really helped it to read as old, worn metal. We used some Creed Camo diluted with water to suggest poisonous algae crawling up the wall in parts.
For the panels, we wanted to go for a strange, even alien effect to serve as a disturbing backdrop for stalking Malstrains. We simply layered up successively brighter mixes of Fulgrim Pink and Administratum Grey, leaving the base of the columns dark with toxic mud and rising up to the lightest grey at the top.


To offset the panels from the metals, and to make the dents and crumples even more vivid, we used Ratling Grime as a dedicated recess shade. Lastly, the burnished effect we had achieved seemed to demand a touch of verdigris, so we sparingly applied some Nihilakh Oxide thinned with Contrast Medium into the deeper nooks and crannies.
To go further still, you could add sparing drybrushes of Underhive Ash or Ryza Rust, and we plan to use an airbrush on some of the lamps for an eerie lighting effect.
Stacked together, all these effects combine to create a dank, oppressive atmosphere – our games of Hive Secundus will be suitably nightmarish. It has been a fun journey to discover how painting terrain can be such a loose, experimental and highly creative process. Our next job is to get it all finished and make our first full tile – the first of many.

The Ruined Underhive Sector is about to hit pre-orders, and it contains enough terrain to really get going. Share your progress with us on Facebook!
* Note that while this seems like an involved process, it’s quick and easy to do in batches – and it’s really fun to be able to smear paint on without worrying about going over the lines!
** You could use other, similarly muted tones here – a light blue or brown, for example.
*** Meaning sprayed from the top, to mimic how overhead light hits an object.